次のようにすると、ディレクトリをまるごとコピーできる。
$ tar cf - . | ( cd /path/to/destdir; tar xvpf - )
takatoh's blog – Learning programming languages.
次のようにすると、ディレクトリをまるごとコピーできる。
$ tar cf - . | ( cd /path/to/destdir; tar xvpf - )
直接編集してもいいけど hostname コマンドで変更できる。
takatoh@nightschool $ hostname
nightschool
takatoh@nightschool $ sudo hostname apostrophe
[sudo] password for takatoh:
127.0.0.1	localhost
127.0.0.1	apostrophe   # <- ここを変更

192.168.1.12    valarie

# The following lines are desirable for IPv6 capable hosts
::1     ip6-localhost ip6-loopback
fe00::0 ip6-localnet
ff00::0 ip6-mcastprefix
ff02::1 ip6-allnodes
ff02::2 ip6-allrouters
takatoh@nightschool $ sudo /etc/init.d/networking restart
takatoh@nightschool $ hostname
apostrophe
これで完了。
/etc/hosts を書き換えてから出ないとネットワークを再起動したときにエラーが出る。
takatoh@nightschool $ sudo /etc/init.d/networking restart
sudo: ホスト apostrophe の名前解決ができません
ちなみに、プロンプトのホスト名が変わってないけど、これは端末を起動し直すとちゃんと変更が反映される。
上記の通りで OK かと思ったら、完全じゃなかった。OS を再起動したらホスト名が戻ってしまった。
takatoh@nightschool $ hostname
nightschool
hostnamectl コマンドで見ると:
takatoh@nightschool $ hostnamectl
   Static hostname: nightschool
         Icon name: computer-desktop
           Chassis: desktop
           Boot ID: 2026269b5ed74ccab65e1a806d7e231f
  Operating System: Ubuntu 14.04.4 LTS
            Kernel: Linux 3.13.0-85-generic
      Architecture: x86_64
hostnamectl コマンドで変更する。
takatoh@nightschool $ sudo hostnamectl set-hostname apostrophe
takatoh@nightschool $ hostnamectl
   Static hostname: apostrophe
         Icon name: computer-desktop
           Chassis: desktop
           Boot ID: 2026269b5ed74ccab65e1a806d7e231f
  Operating System: Ubuntu 14.04.4 LTS
            Kernel: Linux 3.13.0-85-generic
      Architecture: x86_64
参考ページ:
cf. ホスト名を設定する
今まで Ubuntu マシンの nightschool は無線で接続していた。けれどうちの環境(無線LANルータは1階、マシンは2階にある)のせいか、接続が不安定で速度も遅かった。2階にイーサネットのジャックがあるので有線でつないでみたものの、どういうわけかリンクが確立しない(リンクランプが点灯しない、Ubuntu で Ethernet接続が有効にならない)という状況だった。
マシンを買って以来約2年近くもこの状態だったのだけど、ようやく解決するために重い腰を上げた次第。
このページが参考になった。
cf. UbuntuでNICを認識しない場合の対応 – RainbowDevilsLand
まずは現在の状況の確認から。ifconfig コマンドで NIC の状況を見てみる。
takatoh@nightschool $ ifconfig
eth0      Link encap:イーサネット  ハードウェアアドレス f8:bc:12:78:84:ab
          UP BROADCAST MULTICAST  MTU:1500  メトリック:1
          RXパケット:0 エラー:0 損失:0 オーバラン:0 フレーム:0
          TXパケット:0 エラー:0 損失:0 オーバラン:0 キャリア:0
          衝突(Collisions):0 TXキュー長:1000
          RXバイト:0 (0.0 B)  TXバイト:0 (0.0 B)

lo        Link encap:ローカルループバック
          inetアドレス:127.0.0.1  マスク:255.0.0.0
          inet6アドレス: ::1/128 範囲:ホスト
          UP LOOPBACK RUNNING  MTU:65536  メトリック:1
          RXパケット:110255 エラー:0 損失:0 オーバラン:0 フレーム:0
          TXパケット:110255 エラー:0 損失:0 オーバラン:0 キャリア:0
          衝突(Collisions):0 TXキュー長:0
          RXバイト:629344324 (629.3 MB)  TXバイト:629344324 (629.3 MB)

wlan0     Link encap:イーサネット  ハードウェアアドレス 54:35:30:bc:ed:f9
          inetアドレス:192.168.1.5  ブロードキャスト:192.168.1.255  マスク:255.255.255.0
          inet6アドレス: fe80::5635:30ff:febc:edf9/64 範囲:リンク
          inet6アドレス: 2408:212:ac6:e200:5635:30ff:febc:edf9/64 範囲:グローバル
          inet6アドレス: 2408:212:ac6:e200:75ec:809a:c077:3ea5/64 範囲:グローバル
          UP BROADCAST RUNNING MULTICAST  MTU:1500  メトリック:1
          RXパケット:46490 エラー:0 損失:0 オーバラン:0 フレーム:0
          TXパケット:49384 エラー:0 損失:0 オーバラン:0 キャリア:0
          衝突(Collisions):0 TXキュー長:1000
          RXバイト:6255035 (6.2 MB)  TXバイト:18310646 (18.3 MB)
イーサネットの NIC (eth0)自体は認識しているようだけど、アドレスが割り振られていない。
参考にしたページに書かれているのは、NIC 自体が認識されていない場合の対処法だけど、ダメ元で同じようにドライバをインストールしてみることにした。そこで、NIC のチップの種類を調べる。
takatoh@nightschool $ lspci | grep 'Ethernet\|Network'
02:00.0 Ethernet controller: Realtek Semiconductor Co., Ltd. RTL8111/8168/8411 PCI Express Gigabit Ethernet Controller (rev 0c)
03:00.0 Network controller: Qualcomm Atheros QCA9565 / AR9565 Wireless Network Adapter (rev 01)
Realtek の RTL8111/8168/8411 っていうチップのようだ。
Realtek のダウンロードセンターから、RTL8111 を検索してダウンロード。0004-r8168-8.041.01.tar.bz2 というファイルだ。
これを展開する。
takatoh@nightschool $ tar xjvf 0004-r8168-8.041.01.tar.bz2
中に含まれている README ファイルを読むと、autorun.sh を実行すればいいようだ。
takatoh@nightschool $ cd r8168-8.041.01
takatoh@nightschool $ sudo ./autorun.sh

Check old driver and unload it.
rmmod r8169
Build the module and install
Can't read private key
Backup r8169.ko
rename r8169.ko to r8169.bak
DEPMOD 3.13.0-79-generic
load module r8168
Updating initramfs. Please wait.
update-initramfs: Generating /boot/initrd.img-3.13.0-79-generic
Completed.
Completed と出ている。うまくいったか?
ふたたび ifconfig コマンドで確認。
takatoh@nightschool $ ifconfig
eth0      Link encap:イーサネット  ハードウェアアドレス f8:bc:12:78:84:ab
          inetアドレス:192.168.1.20  ブロードキャスト:192.168.1.255  マスク:255.255.255.0
          inet6アドレス: 2408:212:ac6:e200:fabc:12ff:fe78:84ab/64 範囲:グローバル
          inet6アドレス: fe80::fabc:12ff:fe78:84ab/64 範囲:リンク
          inet6アドレス: 2408:212:ac6:e200:486:4ce3:78a7:b216/64 範囲:グローバル
          UP BROADCAST RUNNING MULTICAST  MTU:1500  メトリック:1
          RXパケット:13 エラー:0 損失:0 オーバラン:0 フレーム:0
          TXパケット:25 エラー:0 損失:0 オーバラン:0 キャリア:0
          衝突(Collisions):0 TXキュー長:1000
          RXバイト:1993 (1.9 KB)  TXバイト:4054 (4.0 KB)
          割り込み:45 ベースアドレス:0x4000

lo        Link encap:ローカルループバック
          inetアドレス:127.0.0.1  マスク:255.0.0.0
          inet6アドレス: ::1/128 範囲:ホスト
          UP LOOPBACK RUNNING  MTU:65536  メトリック:1
          RXパケット:110581 エラー:0 損失:0 オーバラン:0 フレーム:0
          TXパケット:110581 エラー:0 損失:0 オーバラン:0 キャリア:0
          衝突(Collisions):0 TXキュー長:0
          RXバイト:629379076 (629.3 MB)  TXバイト:629379076 (629.3 MB)

wlan0     Link encap:イーサネット  ハードウェアアドレス 54:35:30:bc:ed:f9
          inetアドレス:192.168.1.5  ブロードキャスト:192.168.1.255  マスク:255.255.255.0
          inet6アドレス: fe80::5635:30ff:febc:edf9/64 範囲:リンク
          inet6アドレス: 2408:212:ac6:e200:5635:30ff:febc:edf9/64 範囲:グローバル
          inet6アドレス: 2408:212:ac6:e200:75ec:809a:c077:3ea5/64 範囲:グローバル
          UP BROADCAST RUNNING MULTICAST  MTU:1500  メトリック:1
          RXパケット:58509 エラー:0 損失:0 オーバラン:0 フレーム:0
          TXパケット:60687 エラー:0 損失:0 オーバラン:0 キャリア:0
          衝突(Collisions):0 TXキュー長:1000
          RXバイト:7434710 (7.4 MB)  TXバイト:19433795 (19.4 MB)
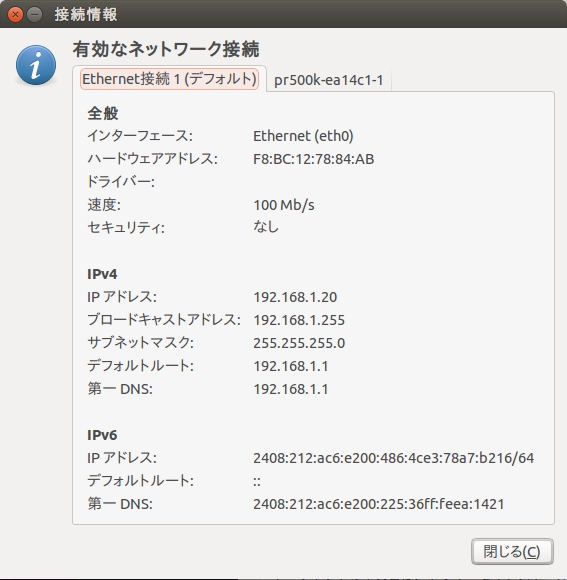
おお、eth0 にもアドレスが割り振られている。画面右上には Ethernet接続のマークも出ている。どうやらうまくいったようだ。
イーサネットの不具合は、ドライバをインストールしたら治った。
接続状況はこうなった。
なぜかはわからないけど、途中で止まってしまう。
まあ、しばらく様子を見るか。
なぜかは知らないけど、このとおり。
^o^ > which gfortran
C:/Strawberry/c/bin/gfortran.EXE
せっかくなので、ちょっと使ってみることにした。
program hello
print *, 'Hello, world!'
end program hello
^o^ > gfortran -o hello hello.f90

^o^ > hello
 Hello, world!
昔、大学で習った FORTRAN77 とはずいぶん趣が違うな。
モンテカルロ法で円周率を求めるプログラムを C で書いてみたんだけど、その中で使っている sqrt() 関数が「定義されていない参照」だと言われてコンパイルできない。
takatoh@nightschool $ gcc -Wall -lm -o pi pi.c
/tmp/ccfG4PRE.o: 関数 `main' 内:
pi.c:(.text+0x81): `sqrt' に対する定義されていない参照です
collect2: error: ld returned 1 exit status
Windows の(Strawberry Perl についてた)gcc ではちゃんとコンパイルできたのに。なんで?
昨日のダイクストラ法を C でやってみた。
#include
#include
#include

#define N 6

typedef struct edge {
   int dest;
    int cost;
} Edge;

typedef struct node {
    Edge *edges[N];
    int edge_num;
    bool done;
    int cost;
    int from;
} Node;

void MakeEdge(Node *nodes[], int a, int b, int cost);
void PrintRoute(Node *nodes[], int start, int goal);
void FreeNodes(Node *nodes[]);

int main(void)
{
    Node *nodes[N];
    Node *start_node, *n, *n2;
    Node *done_node;
    Edge *e;
    int i, j;
    int start, goal;

    // initialize graph.
    for (i = 0; i < N; i++) {
        nodes[i] = (Node *)malloc(sizeof(Node));
        nodes[i]->done = false;
        nodes[i]->cost = -1;
        nodes[i]->from = -1;
        nodes[i]->edge_num = 0;
        for (j = 0; j < N; j++) {
            nodes[i]->edges[j] = NULL;
        }
    }
    MakeEdge(nodes, 0, 1, 2);
    MakeEdge(nodes, 0, 2, 4);
    MakeEdge(nodes, 0, 3, 5);
    MakeEdge(nodes, 1, 2, 3);
    MakeEdge(nodes, 2, 3, 2);
    MakeEdge(nodes, 1, 4, 6);
    MakeEdge(nodes, 2, 4, 2);
    MakeEdge(nodes, 4, 5, 4);
    MakeEdge(nodes, 3, 5, 6);

    start = 0;
    goal = 5;

    start_node = nodes[start];
    start_node->cost = 0;
    start_node->done = true;
    for (i = 0; i < start_node->edge_num; i++) {
        e = start_node->edges[i];
        n = nodes[e->dest];
        n->cost = e->cost;
        n->from = start;
    }

    while (true) {
        done_node = NULL;
        for (i = 0; i < N; i++) {
            n = nodes[i];
            if (n->done || n->cost < 0) {
                continue;
            } else {
                for (j = 0; j < nodes[i]->edge_num; j++) {
                    e = n->edges[j];
                    n2 = nodes[e->dest];
                    if (n2->cost < 0) {
                        n2->cost = nodes[i]->cost + e->cost;
                        n2->from = i;
                    } else if (n->cost + e->cost < n2->cost) {
                        n2->cost = n->cost + e->cost;
                        n2->from = i;
                    }
                }
                if (done_node == NULL || n->cost < done_node->cost) {
                    done_node = n;
                }
            }
            done_node->done = true;
        }
        if (done_node == NULL) {
            break;
        }
    }

    printf("%d\n", nodes[goal]->cost);
    PrintRoute(nodes, start, goal);

    FreeNodes(nodes);

    return 0;
}

void MakeEdge(Node *nodes[], int a, int b, int cost)
{
    Edge *e1, *e2;

    e1 = (Edge *)malloc(sizeof(Edge));
    e1->dest = b;
    e1->cost = cost;
    nodes[a]->edges[nodes[a]->edge_num] = e1;
    nodes[a]->edge_num++;

    e2 = (Edge *)malloc(sizeof(Edge));
    e2->dest = a;
    e2->cost = cost;
    nodes[b]->edges[nodes[b]->edge_num] = e2;
    nodes[b]->edge_num++;

    return;
}

void PrintRoute(Node *nodes[], int start, int goal)
{
    int route[N];
    int hop = 0;

    route[hop] = goal;
    for (hop = 0; route[hop] != start; hop++) {
        route[hop + 1] = nodes[route[hop]]->from;
    }

    printf("%d", route[hop--]);
    for (; hop >= 0; hop--) {
        printf(" -> %d", route[hop]);
    }
    printf("\n");

    return;
}

void FreeNodes(Node *nodes[])
{
    int i, j;

    for (i = 0; i < N; i++) {
        for (j = 0; j < nodes[i]->edge_num; j++) {
            free(nodes[i]->edges[j]);
        }
        free(nodes[i]);
    }

    return;
}
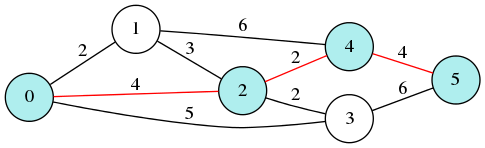
takatoh@nightschool $ ./dijkstra
10
0 -> 2 -> 4 -> 5
ダイクストラ法とは、グラフ上の最短経路問題をとくアルゴリズム。↓このページに詳しいアルゴリズムの説明がある。
cf. ダイクストラ法(最短経路問題) – deq notes
Ruby でやってみた。
例題は、上のページにもあるこのグラフ(ただしノードにつけた番号のせいか上下が逆になっている)。
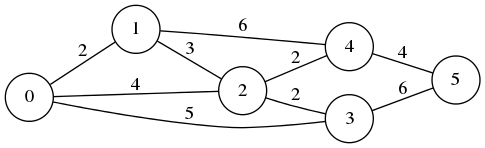
円(ノード)に番号がふられ、ノードをつなぐ辺(エッジ)にはそこを通るときのコスト(距離とも時間とも解釈できる)が付されている。この中の任意の 2 つのノードをつなぐ最短経路とコストを求めるのが最短経路問題だ。
今回は 0 番のノードをスタートし 5 番のノードをゴールとする最短経路とそのコストを求めてみる。
#!/usr/bin/env ruby
# encoding: utf-8

class Node

  attr_reader :name
  attr_accessor :done, :cost, :from

  def initialize(name)
    @name = name
    @edges = []
    @done = false
    @cost = nil
    @from = nil
  end

  def add_edge(edge)
    @edges << edge
  end

  def each_edge
    @edges.each{|e| yield(e) }
  end

end

Edge = Struct.new(:dest, :cost)

def make_edge(nodes, a, b, cost)
  nodes[a].add_edge(Edge.new(b, cost))
  nodes[b].add_edge(Edge.new(a, cost))
end

nodes = []
0.upto(5) do |i|
  nodes << Node.new(i)
end

edges = [
  [0, 1, 2],    # [node_a, node_b, cost]
  [0, 2, 4],
  [0, 3, 5],
  [1, 2, 3],
  [2, 3, 2],
  [1, 4, 6],
  [2, 4, 2],
  [4, 5, 4],
  [3, 5, 6]
]
edges.each do |a, b, cost|
  make_edge(nodes, a, b, cost)
end

start = 0
goal = 5

start_node = nodes[start]
start_node.cost = 0
start_node.done = true
start_node.each_edge do |edge|
  n = nodes[edge.dest]
  n.cost = edge.cost
  n.from = start_node.name
end

while true do
  done_node = nil
  nodes.each do |node|
    if node.done || node.cost.nil?
      next
    else
      node.each_edge do |e|
        n = nodes[e.dest]
          if n.cost.nil?
          n.cost = node.cost + e.cost
          n.from = node.name
        else
          if node.cost + e.cost < n.cost
            n.cost = node.cost + e.cost
            n.from = node.name
          end
        end
      end
      if done_node.nil? || node.cost < done_node.cost
        done_node = node
      end
    end
  end
  done_node.done = true
  break if nodes.all?{|n| n.done }
end

puts nodes[goal].cost
route = [goal]
begin
  node = nodes[route.first]
  route.unshift(node.from)
end
until route.first == start

 puts route.map(&:to_s).join(" -> ")
実行結果:
takatoh@nightschool $ ruby dijkstra.rb
10
0 -> 2 -> 4 -> 5
というわけで、最短経路は 0 -> 2 -> 4 -> 5、コストは 10 という答えが得られた。これは上のリンク先の答えと同じなので、あっていると思っていいだろう。
昨日のプログラムに、サブディレクトリのファイルを再帰的にリストアップする -r オプションをつけてみた。
#include
#include
#include
#include
#include
#include

void listfiles(char *path, int recursive);
void joinpath(char *path, const char *path1, const char *path2);

int main(int argc, char **argv)
{
    char path[256];
    char result;
    int recursive = 0;

    while ((result = getopt(argc, argv, "r")) != -1) {
        switch(result) {
        case 'r':
            recursive = 1;
            break;
        case '?':
            exit(1);
        }
    }

    if (argc == optind) {
        strcpy(path, ".");
    } else {
        strcpy(path, argv[optind]);
    }

    listfiles(path, recursive);

    return 0;
}

void listfiles(char *path, int recursive)
{
    DIR *dir;
    struct dirent *dp;
    struct stat fi;
    char path2[256];

    dir = opendir(path);
    for (dp = readdir(dir); dp != NULL; dp = readdir(dir)) {
        if (dp->d_name[0] != '.') {
            joinpath(path2, path, dp->d_name);
            stat(path2, &fi);
            if (S_ISDIR(fi.st_mode)) {
                if (recursive) {
                    listfiles(path2, recursive);
                }
            } else {
                printf("%s\n", path2);
            }
        }
    }
    closedir(dir);

    return;
}

void joinpath(char *path, const char *path1, const char *path2)
{
    strcpy(path, path1);
    strcat(path, "/");
    strcat(path, path2);

    return;
}
takatoh@nightschool $ ./listfiles -r .
./stack/linkedlist.c
./stack/linkedlist.h
./stack/main.c
./listfiles
./fib.c
./btreesort.c
./linkedlist.c
./web_color_code.c
./strrand.c
./bmp/win-jpeg.bmp
./bmp/dog2.bmp
./bmp/bmp.c
./bmp/win-4.bmp
./bmp/win-16-1.bmp
./bmp/dog.bmp
./bmp/win-32-bf-888.bmp
./bmp/win-8.bmp
./bmp/win-32.bmp
./bmp/win-16-bf-324.bmp
./bmp/win-32-t.bmp
./bmp/win-16-t.bmp
./bmp/bmp.h
./bmp/os-4.bmp
./bmp/os-1.bmp
./bmp/win-32-bf-td.bmp
./bmp/win-1.bmp
./bmp/win-png.bmp
./bmp/win-8-td.bmp
./bmp/os-8.bmp
./bmp/os-24.bmp
./bmp/win-4-rle.bmp
./bmp/win-16.bmp
./bmp/win-32-bf-833.bmp
./bmp/Makefile
./bmp/win-24.bmp
./bmp/pic1.bmp
./bmp/win-8-rle.bmp
./bmp/bmpinfo.c
./code2rgb.c
./btree/btree.c
./btree/btree.h
./btree/main.c
./mergesort.c
./quicksort.c
./transhex.c
./heapsort.c
./filter.c
./greeting.c
./bubblesort.c
./listfiles.c
readdir() 関数を使う。ファイルとディレクトリの判別には stat() 関数の戻り値(stat 構造体)の st_mode を使う。これにはディレクトリかどうかを判別する S_ISDIR マクロが用意されている。今回はディレクトリでなければファイルだと思うことにした。
あと、「.」で始まるファイル(とディレクトリ)は無視した。
#include <stdio.h>
#include <dirent.h>
#include <sys stat.h="">
#include <string.h></string.h></sys></dirent.h></stdio.h>

void listfiles(char *path);
void joinpath(char *path, const char *path1, const char *path2);

int main(int argc, char **argv)
{
    char path[256];

    if (argc == 1) {
        strcpy(path, ".");
    } else {
        strcpy(path, argv[1]);
    }

    listfiles(path);

    return 0;
}

void listfiles(char *path)
{
    DIR *dir;
    struct dirent *dp;
    struct stat fi;
    char path2[256];

    dir = opendir(path);
    for (dp = readdir(dir); dp != NULL; dp = readdir(dir)) {
        if (dp->d_name[0] != '.') {
            joinpath(path2, path, dp->d_name);
            stat(path2, &fi);
            if (!S_ISDIR(fi.st_mode)) {
                printf("%s\n", path2);
            }
        }
    }
    closedir(dir);

    return;
}

void joinpath(char *path, const char *path1, const char *path2)
{
    strcpy(path, path1);
    strcat(path, "/");
    strcat(path, path2);

    return;
}
実行例:
takatoh@nightschool $ ./listfiles
./listfiles
./fib.c
./btreesort.c
./linkedlist.c
./web_color_code.c
./strrand.c
./code2rgb.c
./mergesort.c
./quicksort.c
./listfiles_r.c
./transhex.c
./heapsort.c
./filter.c
./greeting.c
./bubblesort.c
./listfiles.c
takatoh@nightschool $ ./listfiles btree
btree/btree.c
btree/btree.h
btree/main.c