Pythonで全文検索を実装してみた

JavaScript でやってるのを見かけたので。

 cf. JavaScriptで全文検索(N-gram)を実装してみる! – Simple is Beautiful.

アルゴリズムは N-gram っていう方法のうちでも簡単な uni-gram っていうみたい。詳しくはリンク先の記事を見て。

記事の説明を読んで、なんとなく理解したので Python で書いてみた。リンク先の JavaScript の実装はファイル名を参考にしたくらいで、ちゃんと読んでない。

できたのはこんな感じ。

  • create_index.py でインデックスを作って、search.py で検索
  • 検索対象のファイルはテキストファイルのみ。documents ディレクトリに入ってる
  • インデックスファイルは indexes ディレクトリ内につくる
  • document ID とファイル名の対応は docs.json ファイル

インデックスを作る create_index.py

from unigram import document
import json
import os


DOC_DIR = 'documents'
INDEX_DIR = 'indexes'
DOC_DATA = 'docs.json'


files = [os.path.join(DOC_DIR, f) for f in os.listdir(DOC_DIR)]
docs = {}
doc_id = 0
for file in files:
    with open(file, 'r') as f:
        text = f.read()
        tokens = document.tokenize(text)
        index = document.classify(tokens)
        document.save_index(index, doc_id, INDEX_DIR)
    docs[str(doc_id)] = {'name': os.path.basename(file), 'path': file}
    doc_id += 1

with open(DOC_DATA, 'w') as f:
    json.dump(docs, f, indent=2)

検索コマンド search.py

from unigram import document
import json
import os
import sys


INDEX_DIR = 'indexes'
DOC_DATA = 'docs.json'


string = sys.argv[1]

with open(DOC_DATA, 'r') as f:
    docs = json.load(f)
fcount = len(docs)

index_files = list(map(lambda x: os.path.join(INDEX_DIR, x), os.listdir(INDEX_DIR)))
index = {}
for file in index_files:
    c = chr(int(os.path.basename(file).replace('.index', '')))
    with open(file, 'r') as f:
        index[c] = document.parse_index(f.read())

m = list(map(lambda x: index[x], list(string)))

for i in range(fcount):
    doc_id = str(i)
    if not all(map(lambda x: doc_id in x.keys(), m)):
        continue
    n = list(map(lambda x: x[doc_id], m))
    s = set(n[0])
    for s1 in n[1:]:
        s = set(list(map(lambda x: x + 1, s)))
        s = s & set(s1)
    if len(s) > 0:
        pos = list(map(lambda x: x - len(string) + 1, s))
        pos.sort()
        print(docs[doc_id]['name'], pos)

両方から使うモジュール unigram/document.py

import os


def tokenize(text):
    return list(text)


def classify(token_list):
    tokens = {}
    pos = 0
    for t in token_list:
        if not t in tokens:
            tokens[t] = []
        tokens[t].append(pos)
        pos += 1
    return tokens


def save_index(index, doc_id, index_dir):
    for c, idx in index.items():
        l = str(doc_id) + ':' + ','.join(list(map(lambda x: str(x), idx))) + '\n'
        with open(os.path.join(index_dir, str(ord(c)) + '.index'), 'a') as f:
            f.write(l)


def parse_index(content):
    l = content.split('\n')
    l.pop()
    index = {}
    for l2 in l:
        a = l2.split(':')
        index[a[0]] = [int(x) for x in a[1].split(',')]
    return index

とにかくまずは動くものを、ってことで作ったので、コードが整理されてないのは目を瞑ってほしい(後で直す)。

検索対象ファイルのサンプルには、別のプロジェクトで書いた Ruby のソースファイル。

takatoh@apostrophe $ ls documents
Gemfile       Rakefile  boot.rb    config.yaml
Gemfile.lock  app.rb    config.ru  config.yaml.example

インデックスを作る。

takatoh@apostrophe $ python create_index.py

できたインデックスファイルがこれ。

takatoh@apostrophe $ ls indexes
10.index   111.index  123.index  44.index  58.index  71.index  84.index
100.index  112.index  124.index  45.index  60.index  72.index  85.index
101.index  113.index  125.index  46.index  61.index  73.index  87.index
102.index  114.index  126.index  47.index  62.index  74.index  89.index
103.index  115.index  32.index   48.index  63.index  75.index  91.index
104.index  116.index  34.index   49.index  64.index  76.index  93.index
105.index  117.index  35.index   50.index  65.index  77.index  95.index
106.index  118.index  36.index   51.index  66.index  78.index  97.index
107.index  119.index  39.index   52.index  67.index  79.index  98.index
108.index  120.index  40.index   53.index  68.index  80.index  99.index
109.index  121.index  41.index   55.index  69.index  82.index
110.index  122.index  43.index   56.index  70.index  83.index

「require」という文字列を検索してみる。ファイル名と出現位置(のリスト)が出力される。

takatoh@apostrophe $ python search.py require
boot.rb [0, 17]
Rakefile [0, 15, 32, 71]
config.ru [0]
app.rb [0, 23, 40, 56, 71]

大丈夫そうだ。
リスト(配列)の中で隣り合う同じ値をグループ化する(3)

しつこいようだけど、今度は Go でやってみた。

package main

import (
    "fmt"
)

func main() {
    var l1 = []int{1, 1, 2, 2, 3, 1, 1}
    var l2 = []int{}

    fmt.Printf("%v\n", adjacentGroup(l1))
    fmt.Printf("%v\n", adjacentGroup(l2))
}

func adjacentGroup(l []int) [][]int {
    var result [][]int

    if len(l) == 0 {
        return result
    }

    var current = []int{l[0]}
    for i := 1; i < len(l); i++ {
        if current[0] == l[i] {
            current = append(current, l[i])
        } else {
            result = append(result, current) current = []int{l[i]}
        }
    }
    result = append(result, current) return result
} 
^o^ > go run adjacentGroup.go
[[1 1] [2 2] [3] [1 1]]
[]

リスト(配列)の中で隣り合う同じ値をグループ化する(2)

こないだのやつを Scheme と Haskell でやってみた。

まずは Scheme 版。

(define adjacent-group
  (lambda (lis)
    (let loop ((l (cdr lis)) (c (car lis)) (r (cons (list (car lis)) '())))
      (if (null? l)
          (reverse (map reverse r))
          (if (= (car l) c)
              (loop (cdr l) c (cons (cons (car l) (car r)) (cdr r)))
              (loop (cdr l) (car l) (cons (list (car l)) r)))))))

(print (adjacent-group '(1 1 2 2 3 1 1)))
^o^ >gosh adjacent-group.scm
((1 1) (2 2) (3) (1 1))

基本的な考え方は、Ruby や Python のと同じ。ちょっと工夫したのは、先頭の要素を最初から結果のリストに入れたこと。これで分岐条件が1つ減った。
……のはいいんだけど、これって引数に空リストが来た時のことが考えられてないじゃないか。まあ、グループ化しようというんだから空リストは考えなくてもいいか……ホントか?

さて、Haskell 版。こっちはちゃんと空リストが来ても大丈夫(実行例は示さないけど)。

adjacentGroup :: [Int] -> [[Int]]
adjacentGroup [] = []
adjacentGroup (x:xs) = reverse $ map reverse $ foldl f [[x]] xs
  where
    f (y:ys) z = if head y == z
                 then (z:y):ys
                 else (z:[]):y:ys

main :: IO()
main = print $ adjacentGroup [1, 1, 2, 2, 3, 1, 1]
^o^ >runhaskell adjacentGroup.hs
[[1,1],[2,2],[3],[1,1]]

[追記](9/27)

Scheme 版を空リスト対応にした。分岐条件が1つ増えた。

(define adjacent-group
  (lambda (lis)
    (let loop ((l lis) (c (undefined)) (r '()))
      (if (null? l)
          (reverse (map reverse r))
          (cond
            ((undefined? c) (loop (cdr l) (car l) (cons (list (car l)) r)))
            ((= (car l) c) (loop (cdr l) c (cons (cons (car l) (car r)) (cdr r))))
            (else (loop (cdr l) (car l) (cons (list (car l)) r))))))))

(print (adjacent-group '(1 1 2 2 3 1 1)))
(print (adjacent-group '()))
^o^ >gosh adjacent-group2.scm
((1 1) (2 2) (3) (1 1))
()

[さらに追記](9/28)

分岐条件を工夫して2つに減らせた。cond じゃなく if になった。

(define adjacent-group
  (lambda (lis)
    (let loop ((l lis) (c (undefined)) (r '()))
      (if (null? l)
          (reverse (map reverse r))
          (if (and (not (undefined? c)) (= (car l) c))
              (loop (cdr l) c (cons (cons (car l) (car r)) (cdr r)))
              (loop (cdr l) (car l) (cons (list (car l)) r)))))))

(print (adjacent-group '(1 1 2 2 3 1 1)))
(print (adjacent-group '()))
^o^ > gosh adjacent-group3.scm
((1 1) (2 2) (3) (1 1))
()

リスト(配列)の中で隣り合う同じ値をグループ化する

リストでも配列でもいいけど、つまりこういうのを

[1, 1, 2, 2, 3, 1, 1]

こうしたい。

[[1, 1], [2, 2], [3], [1, 1]]

Ruby でやってみた。

def adjacent_group(ary)
  result = []
  current = nil
  ary.each do |x|
    if current.nil?
      current = x
      result << [x]
    elsif x == current
      result[-1] << x
    else
      current = x
      result << [x]
    end
  end
  result
end

p adjacent_group([1, 1, 2, 2, 3, 1, 1])
^o^ >ruby adjacent_group.rb
[[1, 1], [2, 2], [3], [1, 1]]

おなじく Python で。

def adjacent_group(lis):
    result = []
    current = None
    for x in lis:
        if current is None:
            current = x
            result.append([x])
        elif x == current:
            result[-1].append(x)
        else:
            current = x
            result.append([x])
    return result

print(adjacent_group([1, 1, 2, 2, 3, 1, 1]))
^o^ >python adjacent_group.py
[[1, 1], [2, 2], [3], [1, 1]]

ちょっとベタだな。もう少しスマートにいかないものか、と考えて Ruby の Array#inject が使えそうだと思いついた。

def adjacent_group(ary)
  ary.inject([[]]) do |a, x|
    if a[-1].empty? || x == a[-1][-1]
      a[-1] << x
    else
      a << [x]
    end
    a
  end
end

p adjacent_group([1, 1, 2, 2, 3, 1, 1])
^o^ >ruby adjacent_group2.rb
[[1, 1], [2, 2], [3], [1, 1]]

うまくいった。

さて、じゃ、Python ではどうか。reduce を使えば同じことができると考えたけど、Python の reduce は初期値がとれない。まあ、それはリストの頭に初期値をつけてやれば済む話ではあるけど、もうひとつ問題がある。Ruby の Array#inject はブロックをとれるけど、Python の reduce には関数を渡してやらなきゃいけないので、関数定義がひとつ増えてしまう。一行では書けないので lambda 式は使えない。
というわけで、上のようにベタに書いたほうがまだマシそうだ。何かいい書き方があったら、誰か教えてください。

[追記](9/25)

Ruby の2つ目の実装では、引数に空の配列を渡したときに期待通りに動作しない([[]] が返ってきてしまう)。そこでちょっと直したのがこれ。

def adjacent_group(ary)
  ary.inject([]) do |a, x|
    if !a.empty? && x == a[-1][-1]
      a[-1] << x
    else
      a << [x]
    end
    a
  end
end

p adjacent_group([1, 1, 2, 2, 3, 1, 1])
p adjacent_group([])
^o^ >ruby adjacent_group.rb
[[1, 1], [2, 2], [3], [1, 1]]
[]

これでいいだろう。

球面上の点を平面上にステレオ投影する

先週のさらに続き。先週は、球面上の点を平面上に投影するのに X, Y 座標をそのまま使って水平投影したけど、今度はステレオ投影というのをやってみる。
ステレオ投影は Wikipedia に詳しく載っている。
先週と同じように、下半球の点 300 個を XY 平面(赤道面)上に投影する。やってみたのが下の図。

コードは次の通り。

#!/usr/bin/env ruby
# encoding: utf-8 require 'csv' def sp(x, y, z)
[x / (1.0 - z), y / (1.0 - z)]
end csv = File.open(ARGV.shift, "r") csv.each_line do |line|
x, y, z = line.parse_csv.map{|v| v.to_f }
r = Math.sqrt(x * x + y * y + z * z)
print sp(x, y, z).map{|v| v * r }.to_csv
end

やっつけ仕事なので、ヘルプもないけど、先週の gss_gen コマンド(--cartesian オプション付き)の結果を入力として、投影点の座標を CSV で出力する。

多数の点を球面上に一様分布させる(2)

一昨日の続き。最初と最後の点を極から移動(位置調整)するのを実装した。ついでに、gem 化して RubyGems.org にアップしておいた。gem install gss_generator でインストールできる。
使い方は次の通り。

^o^ > gss_gen --cartesian --relocate 1.0 600 > c600r.csv

--cartesian はデカルト座標系で出力、--relocate は位置調整のオプション。結果は CSV 形式で標準出力に出力するので c600r.csv ファイルにリダイレクトしている。

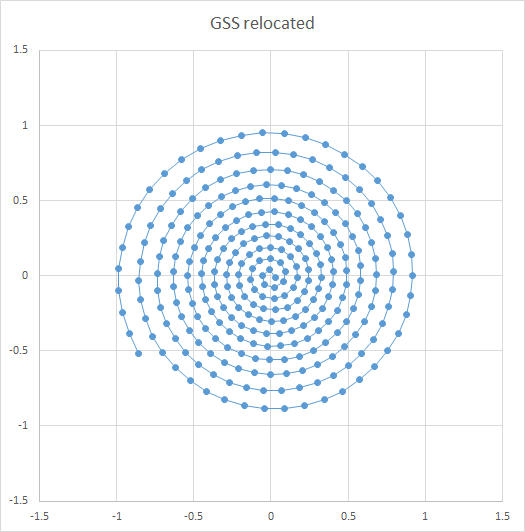
結果を一昨日と同様の図にしたものを載せる。

最初の点が極(中心)からずれて、一様性が増しているのがわかる。

多数の点を球面上に一様分布させる

ちょっと面白いものを見つけた。

cf. LEDドームのLEDの並びを決めるのに使用した計算式 – jakaladaのブログ

球面上に任意個の点を一様分布させる、座標を求めるもの。一般化螺旋集合(generalized spiral set)というものを使っている。元の資料(論文)はここ。

cf. 多数の点を球面上に一様分布させるソフトウェアGSS Generator

上のリンク先のブログでは Python を使っているので、Ruby でやってみた。

#!/usr/bin/env ruby
# encoding: utf-8

require 'gss'
require 'optparse'
require 'csv'

options = {}
opts = OptionParser.new
opts.banner = "Generate points with uniform distribution on the sphere."
opts.on("-c", "--cartesian", "Cartesian coordinate."){|v|
  options[:cartesian] = true
}
opts.on_tail("-h", "--help", "Show this message."){|v|
  print opts.help
  exit
}
opts.on_tail("-v", "--version", "Show version."){|v|
  puts "v#{GSS::VERSION}"
  exit
}
opts.parse!

r = ARGV.shift.to_f
n = ARGV.shift.to_i

gss = GSS::GSS.new
points = gss.generate(r, n)
points.each do |p|
  if options[:cartesian]
    coord = p.to_cartesian
    print coord.to_csv
  else
    print [p.r, p.theta, p.phi].to_csv
  end
end
# encoding: utf-8

require "gss/polar_point"

module GSS
  class GSS
    def generate(r, n)
      theta_1 = Math::PI
      phi_1 = 0.0

      points = []
      points << PolarPoint.new(r, theta_1, phi_1)
      2.upto(n) do |k|
        h_k = -1.0 + 2.0 * (k - 1) / (n - 1)
        theta_k = Math.acos(h_k)
        phi_k = points.last.phi + 3.6 / Math.sqrt(n) * 1 / Math.sqrt(1 - h_k ** 2)
        phi_k = phi_k.infinite? ? 0.0 : phi_k % (Math::PI * 2.0)
        points << PolarPoint.new(r, theta_k, phi_k)
      end
      points
    end
  end # of class GSS
end # of module GSS
# encoding: utf-8
module GSS
  class PolarPoint
    attr_reader :r, :theta, :phi

    def initialize(r, theta, phi)
      @r = r
      @theta = theta
      @phi = phi
    end

    def to_cartesian
      x = @r * Math.sin(@theta) * Math.cos(@phi)
      y = @r * Math.sin(@theta) * Math.sin(@phi)
      z = @r * Math.cos(@theta)
      [x, y, z]
    end
  end # of class PolarPoint
end # of module GSS

最初のがコマンドで、あとの2つがライブラリ。引数に球の半径と配置したい点の個数を指定すると、各点の極座標を CSV 形式で出力する。

^o^ > ruby -Ilib exe/gss_gen 1.0 600

極座標じゃなく、デカルト座標(XYZ座標)がほしい時には --cartesian オプション。

^o^ > ruby -Ilib exe/gss_gen --cartesian 1.0 600

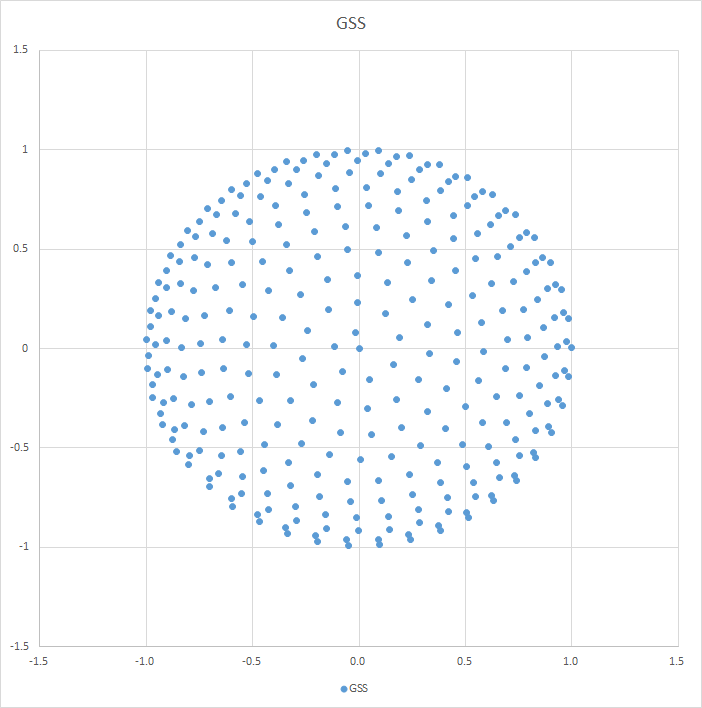
下の図は、発生させた600個の点のうち下半分の300個を XY 平面上に投影した図。

各点を順に線でつないでみると、螺旋になっているのがよくわかる。

……なんか螺旋が逆になってるな。元論文じゃ球面を下から見たと書いてあるからそのせいか?

ともあれ、それらしいのはできた。ただし、最初と最後の点の座標を調整するのはやってない。時間があったらやってみよう。

文字列間のレーベンシュタイン距離を求める(3)Haskell版ふたたび

去年の12月に2つの文字列のレーベンシュタイン距離を求めるっていうのを、JavaScriptHaskell でやった。もともとは Python での実装を参考に2次元配列を使ってやってみたもので、JavaScript版はともかく Haskell版は2次元配列の更新に苦労した。
それが、今日ふと1次元配列でやってみたらどうだろうと思いついた。
つまりこうだ。(m + 1)行×(n + 1)列(m、n は比較する文字列2つの長さ)の各行をつなげた1次元配列を考えて、2次元配列の時の座標を表すタプル (i, j) で初期化しておく。0 < i, 0 < j のとき、(i, j) の値はひとつ左(i-1, j)、ひとつ上(i, j-1)、左上(i-1, j-1)から決まるから、これを1次元配列のインデックスに直すと次のようになる:

  • ひとつ左: i * (n + 1) + j – 1
  • ひとつ上: (i – 1) * (n + 1) + j
  • 左上: (i – 1) * (n + 1) + j – 1

これをコードに落としこんでやるとこうなった:

module Main where

import System.Environment (getArgs)

levenshteinDistance :: String -> String -> Int
levenshteinDistance s1 s2 = last ld
  where
    ld = map f [(x, y) | x <- [0..m], y <- [0..n]]
    m = length s1
    n = length s2
    f (0, 0) = 0
    f (i, 0) = i
    f (0, j) = j
    f (i, j) = minimum [a, b, c]
      where
        a = ld !! (i * (n + 1) + j - 1) + 1
        b = ld !! ((i - 1) * (n + 1) + j) + 1
        c = ld !! ((i - 1) * (n + 1) + j - 1) + c'
        c' = if s1 !! (i - 1) == s2 !! (j - 1) then
          0
        else
          1

main :: IO ()
main = do
  args <- getArgs
  let s1 = args !! 0
  let s2 = args !! 1
  print $ levenshteinDistance s1 s2

結果はこうだ。

takatoh@apostrophe $ runhaskell ld2.hs apple play
4
takatoh@apostrophe $ runhaskell ld2.hs perl pearl
1

OK、うまくいった。

だけど、上のコードはまだ2次元配列の意識を引きずっている。もっと単純にできるはずだ。1次元配列のインデックスを x とすると:

  • ひとつ左: x – 1
  • ひとつ上: x – (n + 1)
  • 左上: x – (n + 1) – 1

となる。これで一般部については2次元配列を気にしなくて良くなった。ただし問題がある。いちばん上の行(第0行)といちばん左の列(第0列)だ。少し考えて、x を (n + 1) で割った商と余りを使えばいいと気がついた。コードにするとこう:

module Main where

import System.Environment (getArgs)

levenshteinDistance :: String -> String -> Int
levenshteinDistance s1 s2 = last ld
  where
    ld = map f [0..((m + 1) * (n + 1) -1)]
    m = length s1
    n = length s2
    f x | x < n + 1                       = x
        | x `rem` (n + 1) == 0 = x `div` (n + 1)
        | otherwise                       = minimum [a, b, c]
    where
      a = ld !! (x - 1) + 1
      b = ld !! (x - (n + 1)) + 1
      c = ld !! (x - (n + 1) - 1) + c'
      c' = if s1 !! i == s2 !! j then
        0
      else
        1
      i = x `div` (n + 1) - 1
      j = x `rem` (n + 1) - 1

main :: IO ()
main = do
  args <- getArgs
  let s1 = args !! 0
  let s2 = args !! 1
  print $ levenshteinDistance s1 s2

1行だけだけど長くなってしまった。だけど考え方はシンプルのように思う。実行してみよう。

takatoh@apostrophe $ runhaskell ld3.hs apple play
4
takatoh@apostrophe $ runhaskell ld3.hs perl pearl
1

OK。

逆関数法で指数分布する乱数を生成する

[0,1)区間の一様乱数から、指数分布にならう乱数を生成するには、逆関数法というのが使える。
指数分布の密度関数は、パラメータをτとすると:
$$ f(\tau)=\lambda e^{-\lambda\tau} $$
であり、分布関数 g(τ) は:
$$ g(\tau)=\int^\tau_{-\infty}{\lambda e^{-\lambda\tau}}d\tau=1-e^{-\lambda\tau} $$
となる。g(τ)は 0~1 の値をとるので、この逆関数:
$$ \tau=-\frac{1}{\lambda}log(1-g(\tau)) $$
の g(τ) の代わりに一様乱数を入力してやれば、τ は指数分布する乱数になる。

じゃあ Ruby でやってみよう。

# encoding: Windows-31J

class RandExpon
  def initialize(lamda)
    @lamda = lamda
    @r = Random.new
  end

  def rand
    -1.0 / @lamda * Math.log(1 - @r.rand)
  end
end

expon = RandExpon.new(0.5)
  10000.times do |i|
  puts expon.rand
end
expon

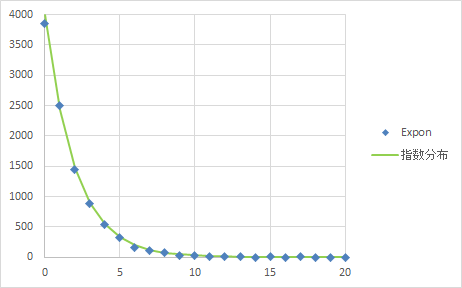
λ=0.5とし、10000個の乱数を発生させている。
これを Excel でグラフ化したのがこれ。

「指数分布」の曲線は、上に書いた密度関数の曲線を、スケールを合わせるために8000倍して描いている。乱数はちゃんと指数分布になっているようだ。

参考にしたページ:
 cf. http://www.ishikawa-lab.com/montecarlo/4shou.html

Box-Muller法で正規分布する乱数を生成する

一様分布する乱数から、正規分布に従う乱数を生成する方法に、Box-Muller法というのがある。
Wikipediaによれば、(0,1) 区間の一様分布乱数2つ(X,Y)から、下の式で2つの正規分布乱数 $ Z_1 $ と $ Z_2 $ が得られる。

$$
Z_1=\sqrt{-2log{X}}\cos{2\pi{Y}}
Z_2=\sqrt{-2log{X}}\sin{2\pi{Y}}
$$

$ Z_1 $ と $ Z_2 $ は標準正規分布となるので、これらに標準偏差 σ をかけて平均 μ を足してやれば、任意の正規分布に従う乱数が得られる。

Ruby で 10000個の乱数を発生させるスクリプトを書いてみた。ここでは平均 μ=1.0、標準偏差 σ=0.2 とした。

# encoding: Windows-31J

class BoxMuller
  def initialize(mu, sigma)
    @mu = mu
    @sigma = sigma
    @r = Random.new
    @z2 = nil
  end

  def rand
    if @z2
      z1 = @z2
      @z2 = nil
    else
      x = @r.rand
      y = @r.rand
      z1 = Math.sqrt(-2.0 * Math.log(x)) * Math.sin(2 * Math::PI * y)
      @z2 = Math.sqrt(-2.0 * Math.log(x)) * Math.cos(2 * Math::PI * y)
    end
    @sigma * z1 + @mu
  end
end

bm = BoxMuller.new(1.0, 0.2)
10000.times do |i|
  puts bm.rand
end

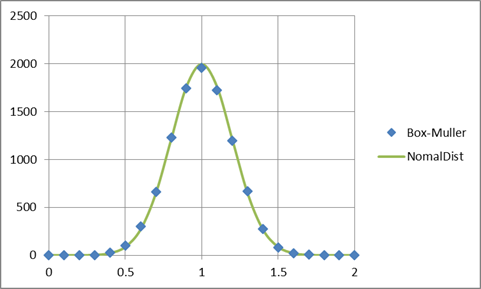
結果を Excel でグラフ化してみた。水色の点が 0.1 単位のヒストグラム。黄緑の線が Excel に用意されている NORM.DIST 関数で描いたもの(スケールを合わせるために NORM.DIST 関数の値は 1000 倍している)。

Box-Muller

こうしてみると、ほぼぴったりと正規分布になっているようだ。

ちなみに Excel で平均値と標準偏差を求めたら、それぞれ μ=0.997、σ=0.201 となった。