Sinatraアプリをunicornで動かす

まずは専用のユーザーを作る。

takatoh@nightschool $ sudo adduser sombrero
ユーザー `sombrero' を追加しています...
新しいグループ `sombrero' (1001) を追加しています...
新しいユーザー `sombrero' (1001) をグループ `sombrero' に追加しています...
ホームディレクトリ `/home/sombrero' を作成しています...
`/etc/skel' からファイルをコピーしています...
新しい UNIX パスワードを入力してください: 
新しい UNIX パスワードを再入力してください: 
passwd: パスワードは正しく更新されました
sombrero のユーザ情報を変更中
新しい値を入力してください。標準設定値を使うならリターンを押してください
	フルネーム []: sombrero
	部屋番号 []: 
	職場電話番号 []: 
	自宅電話番号 []: 
	その他 []: 
以上で正しいですか? [Y/n] Y

新しいユーザー sombrero に sudo する権限をつける。

takatoh@nightschool $ sudo gpasswd -a sombrero sudo
[sudo] password for takatoh: 
ユーザ sombrero をグループ sudo に追加

ユーザー sombrero でログインしなおして、Ruby と Git のバージョンを確認。

sombrero@nightschool:~$ ruby -v
ruby 1.9.3p484 (2013-11-22 revision 43786) [x86_64-linux]
sombrero@nightschool:~$ git --version
git version 1.9.1

GitHub から Sombrero を clone。

sombrero@nightschool:~$ git clone [email protected]:takatoh/sombrero.git
Cloning into 'sombrero'...
Warning: Permanently added the RSA host key for IP address '192.30.252.128' to the list of known hosts.
remote: Reusing existing pack: 903, done.
remote: Total 903 (delta 0), reused 0 (delta 0)
Receiving objects: 100% (903/903), 282.66 KiB | 131.00 KiB/s, done.
Resolving deltas: 100% (577/577), done.
Checking connectivity... done.

必要なライブラリをインストール。

sombrero@nightschool:~$ cd sombrero
sombrero@nightschool:~/sombrero$ sudo bundle install
[sudo] password for sombrero: 
Don't run Bundler as root. Bundler can ask for sudo if it is needed, and
installing your bundle as root will break this application for all non-root
users on this machine.
Fetching gem metadata from https://rubygems.org/..........
Fetching additional metadata from https://rubygems.org/..
Resolving dependencies...
Installing tilt 1.4.1
Installing haml 4.0.5
Using httpclient 2.4.0
Installing rack 1.5.2
Installing rack-protection 1.5.3
Installing sass 3.3.9
Installing sequel 4.12.0
Installing sinatra 1.4.5
Installing sqlite3 1.3.9
Using bundler 1.6.3
Your bundle is complete!
Use `bundle show [gemname]` to see where a bundled gem is installed.
Post-install message from haml:

HEADS UP! Haml 4.0 has many improvements, but also has changes that may break
your application:

* Support for Ruby 1.8.6 dropped
* Support for Rails 2 dropped
* Sass filter now always outputs <style> tags
* Data attributes are now hyphenated, not underscored
* html2haml utility moved to the html2haml gem
* Textile and Maruku filters moved to the haml-contrib gem

For more info see:

http://rubydoc.info/github/haml/haml/file/CHANGELOG.md

もともと運用していたディレクトリからアプリの設定ファイルをコピー。

sombrero@nightschool:~/sombrero$ cp /home/takatoh/w/sombrero/config.yaml .

データベースのマイグレーションを実行。

sombrero@nightschool:~/sombrero$ rake db:migrate
プログラム 'rake' はまだインストールされていません。 次のように入力することでインストールできます:

rake が入ってなかった。インストール。

sombrero@nightschool:~/sombrero$ sudo gem install rake
Fetching: rake-10.3.2.gem (100%)
Successfully installed rake-10.3.2
1 gem installed
Installing ri documentation for rake-10.3.2...
Installing RDoc documentation for rake-10.3.2...

もともとの運用元から、データベースファイルをコピー(上書き)。

sombrero@nightschool:~/sombrero$ sudo cp /home/takatoh/w/sombrero/db/sombrero.db db

ここでいったん、アプリが正常に起動するか確認。

sombrero@nightschool:~/sombrero$ rackup app.ru --port 9000

OK。

Unicorn のインストール。

sombrero@nightschool:~/sombrero$ sudo gem install unicorn
[sudo] password for sombrero: 
Fetching: kgio-2.9.2.gem (100%)
Building native extensions.  This could take a while...
Fetching: raindrops-0.13.0.gem (100%)
Building native extensions.  This could take a while...
Fetching: unicorn-4.8.3.gem (100%)
Building native extensions.  This could take a while...
Successfully installed kgio-2.9.2
Successfully installed raindrops-0.13.0
Successfully installed unicorn-4.8.3
3 gems installed
Installing ri documentation for kgio-2.9.2...
Installing ri documentation for raindrops-0.13.0...
Installing ri documentation for unicorn-4.8.3...
Installing RDoc documentation for kgio-2.9.2...
Installing RDoc documentation for raindrops-0.13.0...
Installing RDoc documentation for unicorn-4.8.3...

いろいろググった結果を見ると Unicorn の前に nginx をたてるのが普通のようだけど、今回は Unicorn のみで行く。公式サイト(?)によれば、アプリのルートディレクトリで unicorn と打てば起動するらしい。

sombrero@nightschool:~/sombrero$ unicorn
/var/lib/gems/1.9.1/gems/unicorn-4.8.3/lib/unicorn/configurator.rb:659:in parse_rackup_file': rackup file (config.ru) not readable (ArgumentError)
	from /var/lib/gems/1.9.1/gems/unicorn-4.8.3/lib/unicorn/configurator.rb:77:in reload'
	from /var/lib/gems/1.9.1/gems/unicorn-4.8.3/lib/unicorn/configurator.rb:68:in initialize'
	from /var/lib/gems/1.9.1/gems/unicorn-4.8.3/lib/unicorn/http_server.rb:100:in new'
	from /var/lib/gems/1.9.1/gems/unicorn-4.8.3/lib/unicorn/http_server.rb:100:in initialize'
	from /var/lib/gems/1.9.1/gems/unicorn-4.8.3/bin/unicorn:126:in new'
	from /var/lib/gems/1.9.1/gems/unicorn-4.8.3/bin/unicorn:126:in new'
	from /usr/local/bin/unicorn:23:in load'
	from /usr/local/bin/unicorn:23:in main'

あれ、ダメだ。あ、rackup のファイルが config.ru じゃなきゃだめなのか。引数に与えてみるか。

sombrero@nightschool:~/sombrero$ unicorn app.ru
I, [2014-07-26T09:26:00.893170 #19156]  INFO -- : listening on addr=0.0.0.0:8080 fd=7
I, [2014-07-26T09:26:00.893297 #19156]  INFO -- : worker=0 spawning...
I, [2014-07-26T09:26:00.893751 #19156]  INFO -- : master process ready
I, [2014-07-26T09:26:00.894064 #19158]  INFO -- : worker=0 spawned pid=19158
I, [2014-07-26T09:26:00.894233 #19158]  INFO -- : Refreshing Gem list
I, [2014-07-26T09:26:01.337048 #19158]  INFO -- : worker=0 ready

今度は無事起動。ポート8080で待機している。今までどおり 9000番ポートで動かすには –port 9000 をオプションとしてつけてやればいいようだ。

Unicorn の設定ファイル unicorn.conf を書く。

listen "9000"
worker_processes 1
pid "./unicorn.pid"
stderr_path "./unicorn.log"
stdout_path "./unicorn.log"

どうも rackup するファイルは設定できないみたいだ。でも、unicorn コマンドの引数に与えてやれば、これで起動してみると、ちゃんと起動しているのが確認できた。

sombrero@nightschool:~/sombrero$ unicorn app.ru -c unicorn.conf

さて、今度はPCを起動したら自動で起動するようにする。それには /etc/init.d 配下に起動用のスクリプトを置く。

#!/bin/sh

PATH=/sbin:/usr/local/bin:/usr/bin
SOMBRERO_ROOT=/home/sombrero/sombrero

case "$1" in
start)
    cd ${SOMBRERO_ROOT}
    unicorn app.ru -c unicorn.conf -D
    ;;
stop)
    PID=`cat ${SOMBRERO_ROOT}/unicorn.pid`
    kill -QUIT ${PID}
    ;;
*)
    echo "Usage: sombrero {start|stop}" &gt;&amp;2
    exit 1
    ;;
esac

exit 0

unicorn についてる -D オプションはデーモン化するためのもの。
で、これをデーモン(サービス)として起動するには、OS のランレベルに応じた /etc/rc?.d フォルダの中に ‘S’ で始まるファイル名でソフトリンクを作ってやればいいらしい。もっとも、この部分は sysv-rc-conf というツールを使うのが通例のようだ。
それじゃ、まずランレベルの確認。

sombrero@nightschool:~$ runlevel
N 2

N が以前のランレベルで、2が現在のランレベルを示しているらしい。以前のランレベルってなんだかわからないけど今回はパス。とにかく現在のランレベルが 2 だということがわかった。
つぎ、sysv-rc-conf のインストール。

sombrero@nightschool:~$ sudo apt-get install sysv-rc-conf

で、この sysv-rc-conf を sudo つきで起動すると下のような画面になる。

sysv-rc-conf

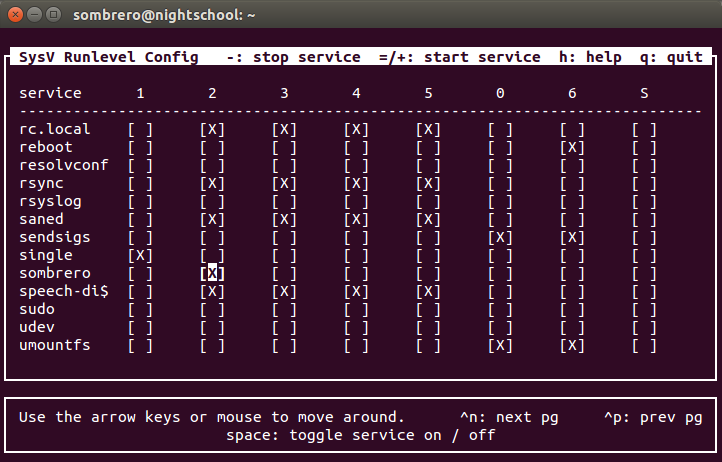
よくわからないけど、sombrero の行の 2 のカラムのところに X 印をつけて保存して終了。
/etc/rc2.d フォルダを確認してみると、S20sombrero という名前でファイル(ソフトリンク)ができているのが確認できる。

sombrero@nightschool:~$ ls -l /etc/rc2.d
合計 4
-rw-r--r-- 1 root root 677  3月 13 10:42 README
lrwxrwxrwx 1 root root  20  7月  5 14:26 S20kerneloops -> ../init.d/kerneloops
lrwxrwxrwx 1 root root  15  7月  5 14:26 S20rsync -> ../init.d/rsync
lrwxrwxrwx 1 root root  18  7月 26 11:58 S20sombrero -> ../init.d/sombrero
lrwxrwxrwx 1 root root  27  7月  5 14:26 S20speech-dispatcher -> ../init.d/speech-dispatcher
lrwxrwxrwx 1 root root  15  7月  5 14:26 S50saned -> ../init.d/saned
lrwxrwxrwx 1 root root  19  7月  5 14:26 S70dns-clean -> ../init.d/dns-clean
lrwxrwxrwx 1 root root  18  7月  5 14:26 S70pppd-dns -> ../init.d/pppd-dns
lrwxrwxrwx 1 root root  21  7月  5 14:26 S99grub-common -> ../init.d/grub-common
lrwxrwxrwx 1 root root  18  7月  5 14:26 S99ondemand -> ../init.d/ondemand
lrwxrwxrwx 1 root root  18  7月  5 14:26 S99rc.local -> ../init.d/rc.local

さあ、これで OK のはずだ。果たして PC を再起動してみると、自動的に起動しているのが確認できた。

今日はここまで。

Ubuntuの端末でRuby 2.1.1を使えるようにした

何を今更、というようなタイトルだけど、どういうことかというと、今までランチャーから新しい端末(コンソール)を起動しただけでは rvm でインストールした Ruby 2.1.1 を使えていなかったのだ。なぜなら、rvm を有効にする設定が .bash_profaile に書かれているのに対して、新しい端末を開いてもこのファイルを読み込まないらしい、からだった。
だから、今までどうしていたかというと、端末を開いたあとに、source .bash_profile とか bash --login とかやってたわけだ。さすがにこれはめんどくさい(実際には端末を開きっぱなしなのでそれほどでもない)。そこで、重い腰を上げて解決することにした。

いろいろ調べてみると、新しい端末を開くと、.bashrc は読み込んでくれるらしい。ということは、.bash_profile に書いてある該当箇所を .bashrc に書き写せばいいはず。.bash_profile の該当箇所はこれ。

[[ -s "$HOME/.rvm/scripts/rvm" ]] && source "$HOME/.rvm/scripts/rvm" # Load RVM into a shell session *as a function*

ところが、これをこのまま .bashrc に書き写しても動かない。どうしてかというと、Ubuntu の sh は bash じゃなくて dash というシェルだから。

takatoh@nightschool $ which sh
/bin/sh
takatoh@nightschool $ ls -al /bin/sh
lrwxrwxrwx 1 root root 4  7月  5 14:26 /bin/sh -> dash

どうも dash では [[ … ]] という書式をサポートしていないらしい。というわけで、.bashrc の他の記述を参考に次のように書き換えた。

if [ -s "$HOME/.rvm/scripts/rvm" ]; then
    source "$HOME/.rvm/scripts/rvm" # Load RVM into a shell session *as a function*
fi

これで、新しい端末で最初から Ruby 2.1.1 が使えるようになった。

takatoh@nightschool $ ruby -v
ruby 2.1.1p76 (2014-02-24 revision 45161) [x86_64-linux]

Ubuntuのポートを開ける

ここの記事が参考になった。

 cf. ubuntuによるポート開放について – YAHOO! JAPAN 知恵袋

ufw というツールを使うといいらしい。まずはインストール。

takatoh@nightschool $ sudo apt-get install ufw
[sudo] password for takatoh: 
パッケージリストを読み込んでいます... 完了
依存関係ツリーを作成しています                
状態情報を読み取っています... 完了
ufw は既に最新バージョンです。
アップグレード: 0 個、新規インストール: 0 個、削除: 0 個、保留: 7 個。

すでに入ってたみたい。

状態を確認。

takatoh@nightschool $ sudo ufw status
状態: 非アクティブ

有効化。

takatoh@nightschool $ sudo ufw enable
ファイアウォールはアクティブかつシステムの起動時に有効化されます。
takatoh@nightschool $ sudo ufw status
状態: アクティブ

無効化するには sudo ufw disable

デフォルトはすべて拒否。

takatoh@nightschool $ sudo ufw default DENY
デフォルトの incoming ポリシーは 'deny' に変更しました
(適用したい内容に基づいて必ずルールを更新してください)

Rails の development 環境で動かしてるアプリにアクセスするため、3000番のポートを開ける。

takatoh@nightschool $ sudo ufw allow 3000/tcp
ルールを追加しました
ルールを追加しました (v6)

これでOK。

RailsとDeviseで管理者ユーザーを作ることに成功した

昼過ぎから半日いろいろとやって、やっと成功したので忘れないうちに手順をメモ。

users テーブルに admin 列を作る

まずは管理者マークをつけるために users テーブルに admin 列を作る。この列が true のユーザーが管理者(admin)てわけ。いろいろググってみると専用のテーブルを作っている例もあるけど、ここはお手軽な方法でいくことにした。

takatoh@nightschool $ rails generate migration add_admin_to_useres admin:boolean

できたマイグレーションファイルを編集。null: falsedefault: false を追記。

class AddAdminToUsers < ActiveRecord::Migration
  def change
    add_column :users, :admin, :boolean, null: false, default: false
  end
end

でもってマイグレーション実行。

takatoh@nightschool $ rake db:migrate

config/initializers/devise.rbを編集

次の行がコメントアウトされているのをやめて、false を true に変更。

config.scoped_views = true

Deviseのviewをコピーして編集

takatoh@nightschool $ rails generate devise:views users

上のコマンドで Devise の標準の view がアプリの中にコピーされる。できたファイルのうち、サインアップに使う app/views/users/registrations/new.html.erb を編集して admin 用のチェックボックスを追加。

<h2>Sign up</h2>
  <%= form_for(resource, as: resource_name, url: registration_path(resource_name)) do |f| %>
  <%= devise_error_messages! %>
  <div>
    <%= f.label :email %>
    <%= f.email_field :email, autofocus: true %>
  </div>
  <div>
    <%= f.label :password %>
    <%= f.password_field :password, autocomplete: "off" %>
  </div>
  <div>
    <%= f.label :password_confirmation %>
    <%= f.password_field :password_confirmation, autocomplete: "off" %>
  </div>
  <% if @noadmin %>
  <div>
    <%= f.label :admin %>
    <%= f.check_box :admin, { }, true, false %>
  </div>
  <% end %>
  <div>
    <%= f.submit "Sign up" %>
  </div>
  <% end %>

<%= render "users/shared/links" %>

controllerの修正

最後は controller の修正。2つ修正がある。ひとつは app/controllers/application_controller.rb。

class ApplicationController < ActionController::Base
  # Prevent CSRF attacks by raising an exception.
  # For APIs, you may want to use :null_session instead.
  protect_from_forgery with: :exception
  before_filter :configure_permitted_parameters, if: :devise_controller?

  private

  def after_sign_in_path_for(resource)
    "/dashboard/"
  end

  def check_signed_in
    unless signed_in?
     redirect_to '/'
    end
  end

  protected

  def configure_permitted_parameters
    devise_parameter_sanitizer.for(:sign_up) << :admin
    devise_parameter_sanitizer.for(:account_update) << :admin
  end
end

もうひとつは app/controllers/users/regitrations_controller.rb。

class Users::RegistrationsController < Devise::RegistrationsController
  def new
    @user = User.new
    @noadmin = User.where('admin = ?', true).empty?
  end
end 

これで終了。

確認

1st-user-sign-up

初めてのユーザーがサインアップしようとしているところ。Admin のチェックボックスが表示されている。ここをチェックしてサインアップすれば管理者になる。

2nd-user-sign-up

で、これが2人目のユーザーがサインアップしようとしているところ。Adminのチェックボックスは表示されていない。

参考にしたページ

 cf. 【Rails4】deviseとactive_adminで一般ユーザーと管理者ユーザーを作成 – avosalmonのブログ
 cf. Rails の認証プラグイン Devise での Strong Parameters について – EasyRamble
 cf. DeviseでViewをカスタマイズする – Qiita

Ubuntuの端末のプロンプトをカスタマイズ

デフォルトでは「ユーザー名@ホスト名:カレントディレクトリ$」となってるんだけど、長いので短くしたい。特にディレクトリの深いところまで行くと1行じゃ納まらなくなったりしてすごく邪魔。
というわけで、↓このページを参考に変更してみた。

 cf. Ubuntu 端末のコマンドプロンプトをカスタマイズしてユーザー名やコンピューター名を非表示にする – Ubuntuアプリのいいところ

リンク先のページでは、ユーザー名とホスト名を消してるけど、上にも書いたとおりディレクトリを消したほうがシンプルになる。
具体的には、.bashrc を PS1 変数を設定している部分(俺の環境では60行目付近)を編集する。

takatoh@nightschool:~$ subl .bashrc
else
    # PS1='${debian_chroot:+($debian_chroot)}\u@\h:\w\$ '
    PS1='${debian_chroot:+($debian_chroot)}\u@\h \$ '
fi

コメントアウトしてあるのが元の行。\w がカレントディレクトリを指しているみたいだ。
で、これを適用するとこうなった。

takatoh@nightschool:~$ source .bashrc
takatoh@nightschool $ 

Node.jsでファイルをダウンロードする(2)

今日はちょっと進んで、JSON 形式のファイルから URL のリストを読み込んでダウンロードする。

var http = require('http');
var fs = require('fs');
var path = require('path');

var list = process.argv[2];

var urls = JSON.parse(fs.readFileSync(list, 'utf8'));
urls.forEach(function(url) {
  console.log(url);
  var filename = path.basename(url);

  // output stream
  var outFile = fs.createWriteStream(filename);

  var req = http.get(url, function(res) {
    res.pipe(outFile);
    res.on('end', function() {
      outFile.close();
    });
  });

  // error handler
  req.on('error', function(err) {
    console.log('Error: ' + err.message);
    return;
  });
});

Node.jsでファイルをダウンロードする

↓このページを参考に書いてみた。っていうかほとんどそのまんまだけど。

 cf. [NodeJS] ファイルをダウンロードする – YoheiM.NET

var http = require('http');
var fs = require('fs');
var path = require('path');

var url = process.argv[2];
console.log(url);
var filename = path.basename(url);

// output stream
var outFile = fs.createWriteStream(filename);

var req = http.get(url, function(res) {
  res.pipe(outFile);
  res.on('end', function() {
    outFile.close();
  });
});

// error handler
req.on('error', function(err) {
  console.log('Error: ' + err.message);
  return;
});

変えたのは URL から保存するファイル名を決めるとことだけ。

このスクリプトのキモは、res.pipe でデータをアウトプットストリームに流しこんでいるところ。で、end イベントが発生したらストリームを閉じる、と。

deviseでユーザー名とパスワードでの認証がうまくいかなかった件

まずは今朝の最後に貼った画面を再掲する。

sign-in-with-name-and-email

見ての通り、サインアップするのにユーザー名、メールアドレス、パスワードの3つが必要だ。これでは面倒なので、ユーザー名とパスワードだけでサインインできるようにしたいと思った。

で、グーグルさんでいろいろ調べてみるとわりと簡単そうだったんだけど、結果から言うとうかくいかなかった。なんでだかわからない。
config/initializers/devise.rb の編集もしたし、ApplicationController に before_filter (configure_permitted_parameters)も書いてみた。けどうまくいかなかった。なんか色々やってるうちにわからなくなってしまった。
さらに、サインアップのときに登録したはずのユーザー名がデータベースに保存されていないことが発覚。ということはつまり、今朝の時点でもうまくいっていなかったってことだ。

結局、メールアドレスとパスワードで認証するところまで巻き戻して、devise をこれ以上いじるのはやめにして、他を進めることにした。devise は、また何か新しい情報を見つけたら試してみよう。

deviseをカスタマイズする

Rails と devise の話はまだ続くよ。今日は devise のビューとコントローラをカスタマイズする。

やっぱりユーザー名がほしい

ユーザーアカウントに Email だけじゃなくて、やっぱりユーザー名がほしい。というわけで、migration スクリプトに2行追加。

class DeviseCreateUsers < ActiveRecord::Migration
  def change
    create_table(:users) do |t|
      ## Database authenticatable
      t.string :name, null: false, default: ""
      t.string :email, null: false, default: ""
      t.string :encrypted_password, null: false, default: ""

      ## Recoverable
      t.string :reset_password_token
      t.datetime :reset_password_sent_at

      ## Rememberable
      t.datetime :remember_created_at

      ## Trackable
      t.integer :sign_in_count, default: 0, null: false
      t.datetime :current_sign_in_at
      t.datetime :last_sign_in_at
      t.string :current_sign_in_ip
      t.string :last_sign_in_ip

      ## Confirmable
      t.string :confirmation_token
      t.datetime :confirmed_at
      t.datetime :confirmation_sent_at
      t.string :unconfirmed_email      # Only if using reconfirmable

      ## Lockable
      # t.integer :failed_attempts, default: 0, null: false
      # Only if lock strategy is :failed_attempts
      # t.string :unlock_token
      # Only if unlock strategy is :email or :both
      # t.datetime :locked_at t.timestamps
    end

    add_index :users, :name, unique: true
    add_index :users, :email, unique: true
    add_index :users, :reset_password_token, unique: true
    add_index :users, :confirmation_token, unique: true
    # add_index :users, :unlock_token, unique: true
  end
end

そしてデータベースの作り直し。

takatoh@nightschool:~/w/lathercraft$ bundle exec rake db:drop
takatoh@nightschool:~/w/lathercraft$ bundle exec rake db:migrate

devise のビューをコピーしてカスタマイズ

デフォルトでは gem のビューが使われているけど、カスタマイズするためにビューをコピーする。

takatoh@nightschool:~/w/lathercraft$ bundle exec rails generate devise:views users
      invoke  Devise::Generators::SharedViewsGenerator
      create    app/views/users/shared
      create    app/views/users/shared/_links.erb
      invoke  form_for
      create    app/views/users/confirmations
      create    app/views/users/confirmations/new.html.erb
      create    app/views/users/passwords
      create    app/views/users/passwords/edit.html.erb
      create    app/views/users/passwords/new.html.erb
      create    app/views/users/registrations
      create    app/views/users/registrations/edit.html.erb
      create    app/views/users/registrations/new.html.erb
      create    app/views/users/sessions
      create    app/views/users/sessions/new.html.erb
      create    app/views/users/unlocks
      create    app/views/users/unlocks/new.html.erb
      invoke  erb
      create    app/views/users/mailer
      create    app/views/users/mailer/confirmation_instructions.html.erb
      create    app/views/users/mailer/reset_password_instructions.html.erb
      create    app/views/users/mailer/unlock_instructions.html.erb

とりあえず、sign up するときの app/views/users/registrations.new.html.erb と sign in するときの app/views/users/sessions/new.html.erb にユーザー名の欄を付け加えた。

<h2>Sign up</h2>
<%= form_for(resource, as: resource_name, url: registration_path(resource_name)) do |f| %>
  <%= devise_error_messages! %>
  <div>
    <%= f.label :name %>
    <%= f.email_field :name, autofocus: true %>
  </div>
  <div>
    <%= f.label :email %>
    <%= f.email_field :email %>
  </div>
  <div>
    <%= f.label :password %>
    <%= f.password_field :password, autocomplete: "off" %>
  </div>
  <div>
    <%= f.label :password_confirmation %>
    <%= f.password_field :password_confirmation, autocomplete: "off" %>
  </div>
  <div>
    <%= f.submit "Sign up" %>
  </div>
<% end %>

<%= render "users/shared/links" %>
<h2>Sign in</h2>
<%= form_for(resource, as: resource_name, url: session_path(resource_name)) do |f| %>
  <div>
    <%= f.label :name %>
    <%= f.email_field :name, autofocus: true %>
  </div>
  <div>
    <%= f.label :email %>
    <%= f.email_field :email %>
  </div>
  <div>
    <%= f.label :password %>
    <%= f.password_field :password, autocomplete: "off" %>
  </div>
  <% if devise_mapping.rememberable? -%>
  <div>
    <%= f.check_box :remember_me %>
    <%= f.label :remember_me %>
  </div>
  <% end -%>
  <div>
    <%= f.submit "Sign in" %>
  </div>
<% end %>

<%= render "users/shared/links" %>

コントローラーのカスタマイズ

コントローラーをカスタマイズするには、Devise::SessionsController, Devise::RegistrationsController, Devise::PasswordsController を継承したクラスを作成して、各メソッドをオーバーライドすればいいようだ。どのメソッドをオーバーライドすればいいかを、bundle exec rake routes で確認する。

takatoh@nightschool:~/w/lathercraft$ bundle exec rake routes
                  Prefix Verb   URI Pattern                       Controller#Action
        new_user_session GET    /users/sign_in(.:format)          devise/sessions#new
            user_session POST   /users/sign_in(.:format)          devise/sessions#create
    destroy_user_session DELETE /users/sign_out(.:format)         devise/sessions#destroy
           user_password POST   /users/password(.:format)         devise/passwords#create
       new_user_password GET    /users/password/new(.:format)     devise/passwords#new
      edit_user_password GET    /users/password/edit(.:format)    devise/passwords#edit
                         PATCH  /users/password(.:format)         devise/passwords#update
                         PUT    /users/password(.:format)         devise/passwords#update
cancel_user_registration GET    /users/cancel(.:format)           devise/registrations#cancel
       user_registration POST   /users(.:format)                  devise/registrations#create
   new_user_registration GET    /users/sign_up(.:format)          devise/registrations#new
  edit_user_registration GET    /users/edit(.:format)             devise/registrations#edit
                         PATCH  /users(.:format)                  devise/registrations#update
                         PUT    /users(.:format)                  devise/registrations#update
                         DELETE /users(.:format)                  devise/registrations#destroy
       user_confirmation POST   /users/confirmation(.:format)     devise/confirmations#create
   new_user_confirmation GET    /users/confirmation/new(.:format) devise/confirmations#new
                         GET    /users/confirmation(.:format)     devise/confirmations#show
(後略)

これを見ると、とりあえずは registration#new と sessions#new かな。それぞれこうした。

class Users::RegistrationsController < Devise::RegistrationsController
end
Devise::SessionsController
  def new
    super
  end

  def create
    super
  end

  def destroy
    super
  end
end

ついでに PasswordsController も。

class Users::PasswordsController < Devise::PasswordsController
end

ルーティングの設定

作ったコントローラーを使うように、ルーティングを変更する。

Rails.application.routes.draw do
  devise_for :users, :controllers => {
    :registrations => "users/registrations",
    :sessions      => "users/sessions",
    :passwords     => "users/passwords"
  }
(後略)

ルーティングを確認してみよう。

takatoh@nightschool:~/w/lathercraft$ bundle exec rake routes
                  Prefix Verb   URI Pattern                       Controller#Action
        new_user_session GET    /users/sign_in(.:format)          users/sessions#new
            user_session POST   /users/sign_in(.:format)          users/sessions#create
    destroy_user_session DELETE /users/sign_out(.:format)         users/sessions#destroy
           user_password POST   /users/password(.:format)         users/passwords#create
       new_user_password GET    /users/password/new(.:format)     users/passwords#new
      edit_user_password GET    /users/password/edit(.:format)    users/passwords#edit
                         PATCH  /users/password(.:format)         users/passwords#update
                         PUT    /users/password(.:format)         users/passwords#update
cancel_user_registration GET    /users/cancel(.:format)           users/registrations#cancel
       user_registration POST   /users(.:format)                  users/registrations#create
   new_user_registration GET    /users/sign_up(.:format)          users/registrations#new
  edit_user_registration GET    /users/edit(.:format)             users/registrations#edit
                         PATCH  /users(.:format)                  users/registrations#update
                         PUT    /users(.:format)                  users/registrations#update
                         DELETE /users(.:format)                  users/registrations#destroy
       user_confirmation POST   /users/confirmation(.:format)     devise/confirmations#create
   new_user_confirmation GET    /users/confirmation/new(.:format) devise/confirmations#new
                         GET    /users/confirmation(.:format)     devise/confirmations#show
(後略)

confirmation のルーティングが devise のままだけど大丈夫かな。

試しにサインアップしてみると、無事うまく行った。

sign-in-with-name-and-email

deviseでサインアップした時にメールを送れるようにする

引き続き devise の話。confirmation 用のメールを送る設定。
config/environments/development.rb に次の設定を追加する。

config.action_mailer.delivery_method = :smtp
config.action_mailer.smtp_settings = {
  :address        => 'smtp.gmail.com',
  :port           => 587,
  :authentication => :plain,
  :user_name      => 'メールアドレス',
  :password       => 'パスワード'
}

とはいえ、メールアドレスやパスワードをハードコーディングするのは良くないよなあ。どうやるのがいいんだろ。

追記

メールアドレスやパスワードの設定場所は、以下のページによると config フォルダ以下に .yml ファイルを作って、config/initializers フォルダにおいたスクリプトで読み込むのがいいらしい。

 cf. Railsの設定情報 – Build INSIDER
 cf. Rails でアプリ固有の設定情報や定数を定義する – EasyRamble

そこで、次のように config/app_config.yaml と config/initializers/app_config.rb を作った。

---
development:
  email: メールアドレス
  email_password: パスワード
test:
  email: メールアドレス
  email_password: パスワード
production:
  email: メールアドレス
  email_password: パスワード
APP_CONFIG = YAML.load_file("#{Rails.root}/config/app_config.yml")[Rails.env]

ところが、これで Rails コンソールを立ち上げようとするとエラーになる。

takatoh@nightschool:~/w/lathercraft$ rails console
/home/takatoh/w/lathercraft/config/environments/development.rb:44:in block in ': uninitialized constant APP_CONFIG (NameError)
	from /home/takatoh/.rvm/gems/ruby-2.1.1/gems/railties-4.1.4/lib/rails/railtie.rb:210:in instance_eval'
	from /home/takatoh/.rvm/gems/ruby-2.1.1/gems/railties-4.1.4/lib/rails/railtie.rb:210:in configure'
	from /home/takatoh/w/lathercraft/config/environments/development.rb:1:in '
	from /home/takatoh/.rvm/gems/ruby-2.1.1/gems/railties-4.1.4/lib/rails/engine.rb:594:in block (2 levels) in '
	from /home/takatoh/.rvm/gems/ruby-2.1.1/gems/railties-4.1.4/lib/rails/engine.rb:593:in each'
	from /home/takatoh/.rvm/gems/ruby-2.1.1/gems/railties-4.1.4/lib/rails/engine.rb:593:in block in '
	from /home/takatoh/.rvm/gems/ruby-2.1.1/gems/railties-4.1.4/lib/rails/initializable.rb:30:in instance_exec'
	from /home/takatoh/.rvm/gems/ruby-2.1.1/gems/railties-4.1.4/lib/rails/initializable.rb:30:in run'
	from /home/takatoh/.rvm/gems/ruby-2.1.1/gems/railties-4.1.4/lib/rails/initializable.rb:55:in block in run_initializers'
	from /home/takatoh/.rvm/rubies/ruby-2.1.1/lib/ruby/2.1.0/tsort.rb:226:in block in tsort_each'
	from /home/takatoh/.rvm/rubies/ruby-2.1.1/lib/ruby/2.1.0/tsort.rb:348:in block (2 levels) in each_strongly_connected_component'
	from /home/takatoh/.rvm/rubies/ruby-2.1.1/lib/ruby/2.1.0/tsort.rb:418:in block (2 levels) in each_strongly_connected_component_from'
	from /home/takatoh/.rvm/rubies/ruby-2.1.1/lib/ruby/2.1.0/tsort.rb:427:in each_strongly_connected_component_from'
	from /home/takatoh/.rvm/rubies/ruby-2.1.1/lib/ruby/2.1.0/tsort.rb:417:in block in each_strongly_connected_component_from'
	from /home/takatoh/.rvm/gems/ruby-2.1.1/gems/railties-4.1.4/lib/rails/initializable.rb:44:in each'
	from /home/takatoh/.rvm/gems/ruby-2.1.1/gems/railties-4.1.4/lib/rails/initializable.rb:44:in tsort_each_child'
	from /home/takatoh/.rvm/rubies/ruby-2.1.1/lib/ruby/2.1.0/tsort.rb:411:in call'
	from /home/takatoh/.rvm/rubies/ruby-2.1.1/lib/ruby/2.1.0/tsort.rb:411:in each_strongly_connected_component_from'
	from /home/takatoh/.rvm/rubies/ruby-2.1.1/lib/ruby/2.1.0/tsort.rb:347:in block in each_strongly_connected_component'
	from /home/takatoh/.rvm/rubies/ruby-2.1.1/lib/ruby/2.1.0/tsort.rb:345:in each'
	from /home/takatoh/.rvm/rubies/ruby-2.1.1/lib/ruby/2.1.0/tsort.rb:345:in call'
	from /home/takatoh/.rvm/rubies/ruby-2.1.1/lib/ruby/2.1.0/tsort.rb:345:in each_strongly_connected_component'
	from /home/takatoh/.rvm/rubies/ruby-2.1.1/lib/ruby/2.1.0/tsort.rb:224:in tsort_each'
	from /home/takatoh/.rvm/rubies/ruby-2.1.1/lib/ruby/2.1.0/tsort.rb:205:in tsort_each'
	from /home/takatoh/.rvm/gems/ruby-2.1.1/gems/railties-4.1.4/lib/rails/initializable.rb:54:in run_initializers'
	from /home/takatoh/.rvm/gems/ruby-2.1.1/gems/railties-4.1.4/lib/rails/application.rb:300:in initialize!'
	from /home/takatoh/w/lathercraft/config/environment.rb:5:in '
	from /home/takatoh/.rvm/gems/ruby-2.1.1/gems/spring-1.1.3/lib/spring/application.rb:92:in preload'
	from /home/takatoh/.rvm/gems/ruby-2.1.1/gems/spring-1.1.3/lib/spring/application.rb:140:in serve'
	from /home/takatoh/.rvm/gems/ruby-2.1.1/gems/spring-1.1.3/lib/spring/application.rb:128:in block in run'
	from /home/takatoh/.rvm/gems/ruby-2.1.1/gems/spring-1.1.3/lib/spring/application.rb:122:in loop'
	from /home/takatoh/.rvm/gems/ruby-2.1.1/gems/spring-1.1.3/lib/spring/application.rb:122:in run'
	from /home/takatoh/.rvm/gems/ruby-2.1.1/gems/spring-1.1.3/lib/spring/application/boot.rb:18:in '
	from /home/takatoh/.rvm/rubies/ruby-2.1.1/lib/ruby/site_ruby/2.1.0/rubygems/core_ext/kernel_require.rb:55:in require'
	from /home/takatoh/.rvm/rubies/ruby-2.1.1/lib/ruby/site_ruby/2.1.0/rubygems/core_ext/kernel_require.rb:55:in require'
	from -e:1:in main'

最初の方に書いてあるけど、APP_CONFIG 定数が初期化されていない、と出てる。推測するに、config/initializers/app_config.rb よりも config/environments/development.rb (ここで APP_CONFIG を参照している)のほうが先に読み込まれるんではなかろうか。
結局、他に方法が思いつかなかったので、config/app_config.yml を config/envronments/development.rb の中で読み込むように変更した。

APP_CONFIG = YAML.load_file("#{Rails.root}/config/app_config.yml")[Rails.env]

config.action_mailer.default_url_options = { :host =&gt; 'localhost:3000' }
config.action_mailer.delivery_method = :smtp
config.action_mailer.smtp_settings = {
  :address        => 'smtp.gmail.com',
  :port           => 587,
  :authentication => :plain,
  :user_name      => APP_CONFIG["email"],
  :password       => APP_CONFIG["email_password"]
}

これでうまく動いた。